Embark on a journey to discover the ins and outs of installing a ductless mini-split air conditioner. This guide promises to unveil the secrets of this modern cooling solution, providing a detailed roadmap for a successful installation process.
Explore the intricacies of setting up a ductless mini-split AC system from start to finish, ensuring a comfortable and efficient cooling experience in any space.
Introduction
Ductless mini-split air conditioners are compact heating and cooling systems that can be installed in individual rooms or spaces without the need for ductwork. They consist of an outdoor compressor unit and one or more indoor air-handling units, connected by refrigerant lines.
Advantages of Installing a Ductless Mini-Split AC System
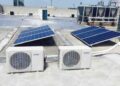
- Energy Efficiency: Ductless mini-split systems are more energy-efficient than traditional HVAC systems since they don't have duct losses.
- Zoning Capabilities: Each indoor unit can be controlled independently, allowing for customized heating and cooling in different areas of the home.
- Easy Installation: The absence of ductwork makes installation easier and less invasive, requiring only a small hole in the wall for the refrigerant lines.
- Improved Air Quality: Ductless systems have multi-stage filtration that can reduce dust, allergens, and other particles in the air.
Key Components of a Ductless Mini-Split Air Conditioner
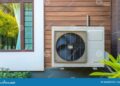
- Outdoor Compressor Unit: This unit houses the compressor, condenser coil, and fan to release or absorb heat from the outside air.
- Indoor Air-Handling Unit: Mounted on the wall or ceiling, this unit contains the evaporator coil, fan, and air filter to distribute conditioned air in the room.
- Refrigerant Lines: These lines connect the outdoor and indoor units, carrying the refrigerant that absorbs and releases heat during the cooling and heating cycles.
- Remote Control: Allows users to adjust temperature settings and fan speed conveniently from a distance.
Planning for Installation
When installing a ductless mini-split air conditioner, proper planning is essential to ensure optimal performance and efficiency. This includes identifying the suitable location for the indoor unit, positioning the outdoor condenser unit, and selecting the right size unit for the space.
Identifying the Suitable Location for Installing the Indoor Unit
When determining the location for the indoor unit, it is important to consider factors such as the size of the room, the layout of the space, and any obstacles that may affect airflow. Ideally, the indoor unit should be installed in a central location within the room to ensure even distribution of air.
Positioning of the Outdoor Condenser Unit
The outdoor condenser unit should be placed in an area that allows for proper ventilation and easy access for maintenance. It is important to keep the unit clear of obstructions such as plants, debris, or structures that may block airflow.
Additionally, the condenser unit should be installed on a stable surface to prevent vibrations and noise.
Choosing the Right Size Unit for the Space
Selecting the correct size unit is crucial for efficient cooling or heating of the space. An undersized unit will struggle to reach the desired temperature, leading to increased energy consumption, while an oversized unit may cycle on and off frequently, resulting in temperature fluctuations and unnecessary wear and tear on the system.
It is recommended to consult with a professional to determine the appropriate size unit based on the square footage and insulation of the space.
Tools and Materials Needed
When installing a ductless mini-split air conditioner, it is essential to have the right tools and materials on hand to ensure a successful installation process.
Tools Required:
- Drill and drill bits
- Screwdriver set
- Level
- Measuring tape
- Hole saw
- Refrigeration manifold gauge set
- Vacuum pump
- Tube cutter
- Wire stripper
Materials Needed:
- Ductless mini-split air conditioner unit
- Mounting bracket
- Refrigerant lines
- Electrical wire
- Condensate drain line
- Insulation tape
- Wall sleeve or hole cover
Additional Accessories:
- Condenser pad or wall mount
- Line set cover
- Remote control
- Smart thermostat (optional)
Installation Steps
Installing a ductless mini-split air conditioner involves several key steps to ensure proper function and efficiency. Below, we detail the process of mounting the indoor unit, connecting it to the outdoor condenser, and insulating the refrigerant lines.
Mounting the Indoor Unit
To mount the indoor unit, follow these steps:
- Choose a suitable location on the wall that is away from direct sunlight and obstacles.
- Use a mounting plate to securely attach the unit to the wall, ensuring it is level.
- Drill a hole through the wall to run the refrigerant lines and wiring to the outdoor unit.
- Securely fasten the unit to the mounting plate, making sure it is level and stable.
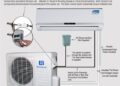
Connecting the Indoor Unit to the Outdoor Condenser
To connect the indoor unit to the outdoor condenser, follow these steps:
- Locate the refrigerant lines and wiring that were run through the wall during installation.
- Connect the refrigerant lines to the corresponding ports on the indoor and outdoor units, following the manufacturer's instructions.
- Connect the wiring from the indoor unit to the outdoor condenser, ensuring a secure and proper connection.
- Test the connections to ensure there are no leaks or loose fittings.
Properly Insulating the Refrigerant Lines
Insulating the refrigerant lines is crucial for maintaining efficiency and preventing energy loss. Follow these steps to properly insulate the lines:
- Use insulation sleeves to cover the refrigerant lines, starting from the indoor unit and working towards the outdoor condenser.
- Secure the insulation sleeves with tape or zip ties to ensure they stay in place and provide adequate coverage.
- Check for any gaps or exposed areas in the insulation and make necessary adjustments to fully cover the lines.
- Properly insulating the refrigerant lines will help maintain the temperature of the refrigerant and improve the overall performance of the system.
Electrical Wiring
When installing a ductless mini-split air conditioner, it is crucial to understand the electrical requirements to ensure a safe and efficient setup. Proper electrical wiring is essential for the functionality of the system.To connect the indoor and outdoor units to power, you will need to run electrical wiring between the two units.
This typically involves connecting the indoor unit to a dedicated 240-volt circuit breaker in the electrical panel and running wiring through a conduit to the outdoor unit.
Connecting Indoor and Outdoor Units
- Ensure the power is turned off at the electrical panel before starting any electrical work.
- Follow the manufacturer's instructions for wiring connections, as they may vary based on the unit model.
- Use a properly sized wire gauge to handle the electrical load of the unit.
- Secure all wiring connections with wire nuts and electrical tape for safety.
- Once the wiring is complete, test the system to ensure it is functioning correctly before closing up the units.
Safety Tips
- Wear insulated gloves and eye protection when working with electrical wiring to prevent any accidents.
- Avoid working on electrical components in wet conditions to reduce the risk of electrical shock.
- If you are unsure about any electrical connections, consult a professional electrician to ensure the job is done correctly and safely.
- Always follow local building codes and regulations when installing electrical wiring for a ductless mini-split air conditioner.
Testing and Commissioning
After successfully installing a ductless mini-split air conditioner, the next crucial step is testing and commissioning the system to ensure proper operation. This process involves checking for leaks in the refrigerant lines and commissioning the unit to ensure everything is functioning as it should.
Testing for Proper Operation
To test the system for proper operation, you should first turn on the unit and ensure that both the indoor and outdoor units are running smoothly. Check the airflow coming out of the indoor unit to make sure it is at the desired level.
Additionally, test the different modes (cooling, heating, fan) to verify that they are working correctly.
- Check the temperature settings to see if the unit is reaching the desired temperature.
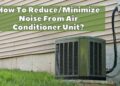
- Listen for any unusual noises coming from the unit, which could indicate a problem.
- Verify that the unit is effectively cooling or heating the space as expected.
Checking for Leaks in the Refrigerant Lines
Leaking refrigerant can compromise the efficiency and performance of your ductless mini-split air conditioner. To check for leaks in the refrigerant lines, you can perform a visual inspection of the lines and connections for any signs of oil or refrigerant leaks.
You can also use a refrigerant leak detector to identify any leaks that may not be visible to the naked eye.
Commissioning the Ductless Mini-Split Air Conditioner
Commissioning the system involves ensuring that all settings are correctly configured and calibrated for optimal performance. You will need to set the appropriate temperature and fan speed settings based on your preferences. Additionally, you may need to adjust the airflow direction and other settings to suit your specific needs.
It is essential to follow the manufacturer's guidelines and recommendations for commissioning the ductless mini-split air conditioner to ensure proper operation and efficiency.
Maintenance and Troubleshooting

Maintaining your ductless mini-split air conditioner is crucial to ensure its efficient operation and longevity. Regular maintenance tasks can help prevent issues and keep the system running smoothly. Additionally, knowing how to troubleshoot common problems can save you time and money on repairs.
Lastly, scheduling professional servicing on a regular basis is important to address any underlying issues and ensure optimal performance of your unit.
Maintenance Tasks
Regular maintenance tasks for your ductless mini-split air conditioner include:
- Cleaning or replacing the air filters every 1-2 months to ensure proper airflow and efficiency.
- Inspecting the indoor and outdoor units for any debris or obstructions that could affect performance.
- Checking the refrigerant levels and ensuring there are no leaks.
- Inspecting the condenser coils and evaporator coils for dirt or dust buildup, cleaning them as needed.
- Ensuring that the drainage system is clear and free of any blockages to prevent water damage.
Troubleshooting Tips
Common issues with ductless mini-split AC units and troubleshooting tips include:
- If the unit is not cooling/heating properly, check the air filters, refrigerant levels, and ensure there are no obstructions around the unit.
- If there are strange noises coming from the unit, check for loose components or debris in the system that may be causing the noise.
- If the unit is leaking water, inspect the drainage system for blockages and ensure proper installation of the unit to prevent water leaks.
- If the unit is not turning on, check the power source, remote control batteries, and ensure the unit is receiving power.
- If there are issues with the temperature sensor, check the positioning of the sensor and ensure it is not obstructed by any objects.
Professional Servicing
Regular servicing by a professional HVAC technician is essential to maintain the performance and efficiency of your ductless mini-split air conditioner. A professional can conduct a thorough inspection, identify any issues early on, and perform necessary repairs or maintenance tasks to keep your unit running smoothly.
Additionally, professional servicing can help extend the lifespan of your system and ensure optimal comfort in your space.
Final Wrap-Up
As we reach the end of this guide, you now possess the knowledge and skills needed to tackle the installation of a ductless mini-split air conditioner with confidence. Get ready to enjoy the benefits of a well-installed cooling system that caters to your comfort needs.
Query Resolution
What are the common locations to install the indoor unit??
Common locations for indoor unit installation include bedrooms, living rooms, and home offices. It's important to choose a spot that allows for optimal air distribution throughout the space.
What tools are needed for a ductless mini-split AC installation?
Tools required may include a drill, screwdrivers, level, and pipe cutter. These tools are essential for a successful installation process.
How can I test the ductless mini-split system for proper operation?
To test the system, ensure that the unit is cooling or heating as expected. Check for any unusual sounds or odors that may indicate a problem.


